The following will allow you to run your own private proxy service for use in SEO Content Machine.
You need a VPS with ubuntu 20.04 installed and the ability to add extra IPs to your instance.
If you need a terminal client I recommend https://www.bitvise.com/
Install Squid
sudo apt update
sudo apt install squid
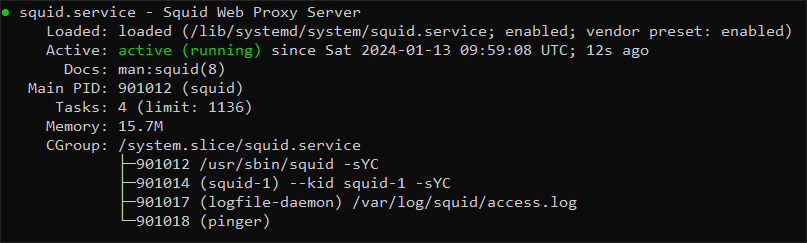
Check Squid is running
systemctl status squid.service
Attach extra IPs to your VPS
Luna Node example
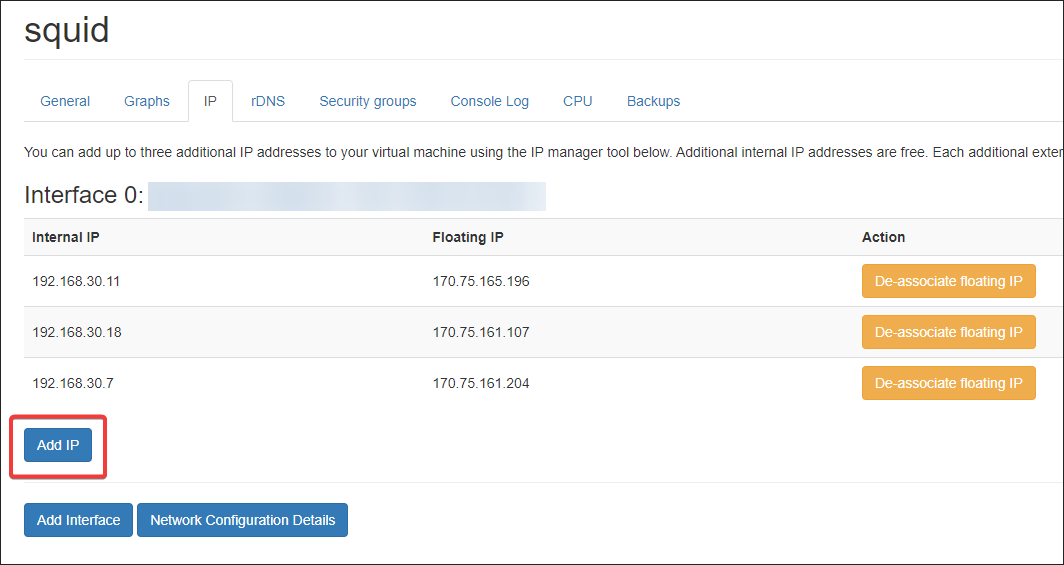
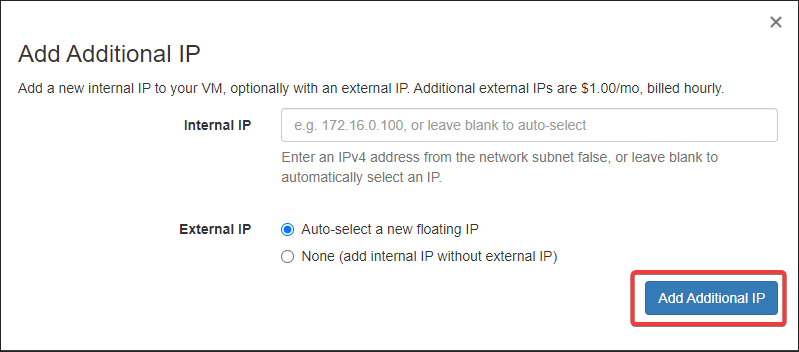
After you add an IP a window will popup with the new network config you must use.
The specific one is Ubuntu netplan at the bottom of window. Like this…
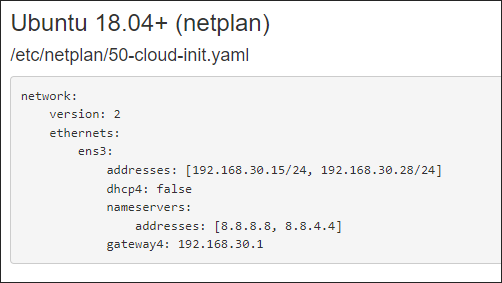
sudo nano /etc/netplan/50-cloud-init.yaml
Replace content content above from Luna Node. eg…

Apply netplan
sudo netplan apply
Verify new IPs
ip address show
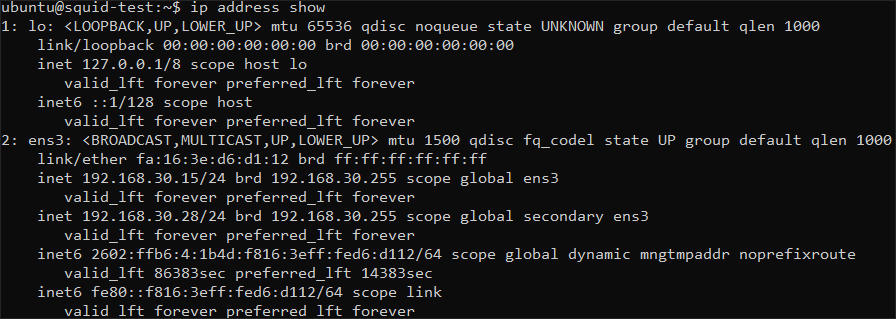
You should see the new IPs in the list.
Edit conf file
For each IP you add, you need to add to ACL like below.
Use internal IP, and you assign any port number you like for each proxy.
Below is sample for 2 IPs, you just need to duplicate sections and assign a different port number.
Just copy-paste the following to the top of the file.
sudo nano /etc/squid/squid.conf
via off
forwarded_for off
request_header_access Allow allow all
request_header_access Authorization allow all
request_header_access WWW-Authenticate allow all
request_header_access Proxy-Authorization allow all
request_header_access Proxy-Authenticate allow all
request_header_access Cache-Control allow all
request_header_access Content-Encoding allow all
request_header_access Content-Length allow all
request_header_access Content-Type allow all
request_header_access Date allow all
request_header_access Expires allow all
request_header_access Host allow all
request_header_access If-Modified-Since allow all
request_header_access Last-Modified allow all
request_header_access Location allow all
request_header_access Pragma allow all
request_header_access Accept allow all
request_header_access Accept-Charset allow all
request_header_access Accept-Encoding allow all
request_header_access Accept-Language allow all
request_header_access Content-Language allow all
request_header_access Mime-Version allow all
request_header_access Retry-After allow all
request_header_access Title allow all
request_header_access Connection allow all
request_header_access Proxy-Connection allow all
request_header_access User-Agent allow all
request_header_access All deny all

acl acid5001 myportname 5001
http_access allow acid5001
tcp_outgoing_address 192.168.30.15 acid5001

acl acid5002 myportname 5002
http_access allow acid5002
tcp_outgoing_address 192.168.30.28 acid5002

http_port 5001 name=5001
http_port 5002 name=5002

shutdown_lifetime 0 seconds
cache deny all
Save the file.
Warning: This method does not secure your proxies if someone is able to guess the IP your server and does a port scan.
You might want to add a src:
acl acid5001 myportname 5001 src xxx.xxx.xxx.xxx
To lock the proxy to be usable only from one IP. (Normally the IP of the PC where SCM is installed)
You can also setup a username password, but this is out of scope for this guide.
Restart Squid
sudo systemctl restart squid.service
Test proxies
Your proxies will be: External server IP + Port eg:
Eg: Proxies
170.75.161.99:5001
170.75.161.99:5002
You can set your browser to use proxies then visit
To verify that the proxy IP is being shown instead of your real IP.